Introduction to Laptop/Desktop Cleaning

In the fast-paced digital age, laptops and desktops have become indispensable tools for both personal and professional use. These devices accompany us through our daily tasks, from work presentations to leisurely browsing. However, amidst their constant usage, one aspect often overlooked is their cleanliness. This section delves into the significance of regular cleaning and highlights common mistakes to avoid in laptop/desktop maintenance.
Understanding the Importance of Regular Cleaning

In our modern lives, where laptops and desktops serve as our digital hubs, ensuring their cleanliness is paramount. Regular cleaning not only enhances the aesthetics of these devices but also plays a crucial role in their longevity and performance. Here, we explore the multifaceted importance of maintaining clean laptops and desktops.
- Enhanced Device Longevity: Dust, dirt, and debris can accumulate over time, leading to overheating and potentially damaging internal components. By regularly cleaning your device, you mitigate the risk of hardware failure and prolong its lifespan.
- Improved Performance: A clean laptop or desktop operates more efficiently. Removing dust from vents and fans prevents overheating, ensuring optimal performance even during demanding tasks such as gaming or video editing.
- Hygiene and Health: Laptops and desktops are breeding grounds for bacteria and germs, especially on frequently touched surfaces like keyboards and touchpads. Regular cleaning helps maintain a hygienic workspace, reducing the risk of infections and illnesses.
- Enhanced User Experience: A clean and well-maintained device provides a better user experience. Crisp, smudge-free screens and responsive keyboards enhance productivity and make using the device a more pleasant experience.
- Preservation of Aesthetic Appeal: Whether it’s for personal or professional use, a clean laptop or desktop reflects positively on its owner. Regular cleaning helps preserve the device’s aesthetic appeal, preventing unsightly marks and stains.
Common Mistakes to Avoid in Laptop/Desktop Cleaning
While the benefits of regular cleaning are undeniable, it’s essential to approach the task with caution to avoid damaging your device inadvertently. Here, we outline some common mistakes that users often make when cleaning their laptops and desktops.
- Using Harsh Cleaning Solutions: Abrasive chemicals and household cleaners can damage the delicate surfaces of laptops and desktops. It’s crucial to use gentle cleaning solutions specifically formulated for electronic devices.
- Applying Liquid Directly: Spraying cleaning solutions directly onto the device can lead to moisture seeping into sensitive components, causing irreparable damage. Instead, apply the solution to a microfiber cloth and then clean the device.
- Neglecting Internal Cleaning: Many users focus solely on external cleaning, overlooking the accumulation of dust and debris inside the device. Proper ventilation and fan maintenance are essential for preventing overheating and hardware failure.
- Using Rough Cleaning Materials: Rough or abrasive materials such as paper towels or scrubbing pads can scratch or damage the surfaces of laptops and desktops. Opt for soft, lint-free cloths like microfiber to avoid scratching the screen or keyboard.
- Ignoring Manufacturer Guidelines: Each laptop or desktop may have specific cleaning instructions provided by the manufacturer. Ignoring these guidelines can void warranties or cause damage. Always refer to the user manual for recommended cleaning methods.
By understanding the importance of regular cleaning and being aware of common mistakes to avoid, you can ensure that your laptop or desktop remains in optimal condition for years to come.
Preparing for Cleaning: Getting Your Laptop/Desktop Ready for a Safe and Effective Shine-Up
Before diving into the actual cleaning process, it’s crucial to prepare your laptop or desktop to ensure a safe and effective experience. Here’s what you need to know:
- Gathering the Necessary Tools and Supplies:
Microfiber Cloths: These are the workhorses of your cleaning kit. Choose lint-free microfiber cloths specifically designed for electronics to avoid scratching delicate surfaces.
Compressed Air Duster: A can of compressed air is essential for blasting out dust bunnies and debris from vents and keyboards. Opt for a can with a controllable nozzle to avoid spraying liquid propellant on your electronics.
Cotton Swabs: Useful for cleaning tight spaces around keys, ports, and other small areas. Make sure they are lint-free to avoid leaving behind unwanted fibers.
Isopropyl Alcohol (Optional): A 70% isopropyl alcohol solution can be used for disinfecting surfaces and removing stubborn stains. Never use pure alcohol or any other harsh chemicals, as they can damage your device.
Cleaning Slime (Optional): This can be helpful for tackling dust and dirt trapped between keyboard keys. Cleaning slime is a putty-like substance that adheres to dust and debris, allowing you to easily remove it.
Flathead Screwdriver (Optional): If you’re comfortable venturing inside your desktop for a more thorough cleaning, a small flathead screwdriver may be needed to remove certain components (use with caution and only if necessary).
Non-abrasive Cleaning Wipes (Optional): Pre-moistened wipes designed for electronics can be a convenient option for cleaning external surfaces. However, ensure they are specifically labeled for electronics and don’t contain any harsh chemicals.
Bowl of Distilled Water (Optional): If using a microfiber cloth with isopropyl alcohol, it’s helpful to have a bowl of distilled water for rinsing the cloth to prevent leaving streaks.
Safety Precautions to Take Before Cleaning:
- Power Down and Unplug: This is the most crucial step. Always turn off your laptop or desktop and completely disconnect it from the power outlet before cleaning. Additionally, remove any external devices like flash drives or external hard drives.
- Remove the Battery (Laptops Only): If your laptop has a removable battery, take it out before cleaning. Consult your user manual for proper battery removal procedures.
- Find a Flat, Clean Work Surface: Choose a clean, well-lit workspace to avoid accidentally dropping or bumping your device during cleaning.
- Work in a Well-Ventilated Area: If using compressed air or isopropyl alcohol, ensure adequate ventilation to avoid inhaling fumes.
- Beware of Static Discharge: Ground yourself by touching a metal object before cleaning to minimize the risk of static discharge that could damage your electronics.
- Read Your User Manual (Optional): While not essential for basic cleaning, your user manual might offer specific recommendations for cleaning your particular device model.
Additional Tips:
- Turn Off Keyboard Backlighting (Laptops): If your laptop has a backlit keyboard, turn it off to avoid accidentally pressing keys while cleaning.
- Gather Trash Receptacle: Have a nearby trash receptacle readily available to discard any removed dust or debris.
- Take Before Pictures (Optional): For desktops you plan to open, taking pictures of component placement before disassembly can be helpful for reassembly later.
By following these steps and gathering the appropriate tools, you’ll be well-equipped for a safe and effective cleaning session for your laptop or desktop.
Dos of Laptop/Desktop Cleaning: Maintaining a Pristine Machine
Now that you’re prepped with the right tools and safety precautions, let’s delve into the proper techniques for cleaning your laptop or desktop. Here are some key dos to ensure a successful cleaning experience:
Using Microfiber Cloths for Gentle Cleaning:
Microfiber cloths are your best friend when cleaning your laptop or desktop. Here’s how to use them effectively:
- Dry Dusting: Start by using a dry microfiber cloth to remove dust from all external surfaces of your device, including the screen, keyboard deck, palm rest, and casing. Gently wipe in straight lines, avoiding circular motions that might push dust into crevices.
- Slightly Damp Cleaning (Optional): For stubborn smudges or fingerprints, you can slightly dampen your microfiber cloth with distilled water. Wring it out thoroughly to ensure it’s barely moist, not dripping. Wipe the surfaces gently, following the same straight line motions.
- Cleaning the Screen: For the delicate screen, only use a dry microfiber cloth specifically designed for cleaning electronics. Avoid using any cleaning solutions or abrasive materials that could damage the screen coating.
Multiple Microfiber Cloths: It’s recommended to have separate microfiber cloths for dry dusting and damp cleaning to avoid spreading dirt or moisture.
Proper Ventilation and Airflow Management:
Maintaining proper ventilation is crucial for your laptop or desktop’s performance and longevity. Here’s how to ensure optimal airflow:
- Compressed Air for Vents: Use compressed air to gently blow out dust and debris accumulated around vents. Hold the can upright and use short bursts to avoid spraying liquid propellant. Focus on the air intake and exhaust vents on your laptop or desktop chassis.
- Cleaning Fans (Desktops – Optional): For desktops, if you’re comfortable venturing inside the case, you can carefully clean the dust from the fans using compressed air. Caution: Only do this with the power off and unplugged, and avoid spinning the fans manually.
- Elevated Laptop Stands: Consider using a laptop stand to improve airflow circulation underneath your device. This helps prevent overheating and allows for better heat dissipation.
Cleaning Keyboard and Mouse Pad Carefully:
The keyboard and mouse pad are breeding grounds for crumbs, dust, and bacteria. Here’s how to clean them effectively:
- Tilting the Laptop (Laptops): Turn off your laptop and gently tilt it boca abajo (upside down) to encourage loose debris to fall out. You can gently tap the back of the laptop to dislodge stubborn particles.
- Compressed Air for Keyboards (Laptops & Desktops): Use compressed air to blow out dust and debris trapped between the keys. Hold the can upright and aim the nozzle between the keys, using short bursts to avoid dislodging any keys.
- Cleaning Slime for Keyboards (Optional): For a more thorough cleaning, gently press cleaning slime between the keys. The slime will pick up dust and debris without damaging the keys.
- Cotton Swabs for Tight Spaces: Use cotton swabs dipped in a bit of isopropyl alcohol (70%) to clean around the edges of the keys and other tight spaces. Ensure the cotton swab is barely damp, not dripping wet.
- Cleaning the Mousepad: For external mouse pads, use a damp microfiber cloth to wipe down the surface. For built-in laptop touchpads, use a slightly damp microfiber cloth or a disinfectant wipe specifically designed for electronics.
Additional Dos:
- Clean Ports Regularly: Use compressed air to gently blow out dust from ports like USB, HDMI, and headphone jacks.
- Clean External Cables: Wipe down external cables like power cords and HDMI cables with a damp microfiber cloth to remove dust and grime.
- Regular Cleaning Schedule: Establish a regular cleaning routine for your laptop or desktop. For basic cleaning, a weekly wipe down with a microfiber cloth might suffice. For a more thorough cleaning with compressed air and potentially isopropyl alcohol, consider doing it every few months.
By following these cleaning practices, you can maintain a clean and well-functioning laptop or desktop, ensuring optimal performance and preventing potential overheating issues. Remember, the key is to be gentle and avoid using excessive force or harsh chemicals.
Don’ts of Laptop/Desktop Cleaning: Preventing Costly Mistakes
While we explored proper cleaning techniques in the previous section, it’s equally important to understand what not to do when cleaning your laptop or desktop. Here are some key don’ts to avoid damaging your valuable electronics:
Avoiding Harsh Chemicals and Abrasive Materials:
- No Harsh Cleaners: Avoid using household cleaners like window cleaners, all-purpose cleaners, or disinfecting wipes not specifically designed for electronics. These cleaners can contain harsh chemicals that can damage the delicate surfaces of your device.
- Ditch the Paper Towels and Tissues: Paper towels and tissues are abrasive and can leave behind lint and scratches on your screen and other surfaces.
- Beware of Alcohol Concentration: If using isopropyl alcohol, ensure it’s a 70% solution. Never use pure alcohol or any other harsh chemicals, as they can damage the screen’s coating or cause fading on plastic components.
Never Spray Liquid Directly onto the Device:
- Liquid is the Enemy: This might seem obvious, but it’s crucial to never spray any liquids directly onto your laptop or desktop. Remember, you’re cleaning the surfaces, not giving them a bath. Liquids can seep into vents and internal components, potentially causing electrical damage.
- The Magic of Microfiber Cloths: Always dampen your microfiber cloth with water or cleaning solution first, then wring it out thoroughly before wiping down your device. This ensures you’re using minimal moisture and avoiding the risk of liquid dripping inside.
- Cleaning Spills Immediately: If you accidentally spill liquid on your device, power it down immediately and unplug it from the power outlet. Gently blot the spill with a clean, absorbent cloth to remove as much liquid as possible. Do not turn it back on right away. Ideally, seek professional help to ensure proper drying and avoid potential damage.
Steering Clear of Excessive Pressure on Screens and Keyboards:
- Delicate Dance with the Screen: The screen is the most fragile component of your device. Avoid applying excessive pressure when cleaning. Use a light touch and gentle swipes with your microfiber cloth.
- Keyboard Cleaning Caution: Don’t press down too hard on the keys while cleaning, as this can damage the delicate key mechanisms. Let the compressed air or cleaning slime do the work of dislodging dust and debris.
- Beware of Submerged Keys: Never submerge your keyboard in any cleaning solution, even for a quick rinse. This can damage the internal components of the keyboard.
Additional Don’ts:
- No Food or Drinks Around Electronics: Avoid eating or drinking near your laptop or desktop to minimize the risk of spills.
- Using Vacuum Cleaners (Not Recommended): While some might recommend using a vacuum cleaner on low suction to remove dust, it’s generally not advisable. Vacuums can generate static electricity and potentially damage delicate internal components. Stick to compressed air for a safer cleaning method.
- Forgetting the Back of the Device: Don’t neglect the back of your laptop or desktop, where dust can also accumulate around vents. Use compressed air to gently blow out any dust buildup.
- Ignoring Internal Cleaning Needs (Desktops – Optional): For desktops, if you’re comfortable doing so, consider a more thorough cleaning every year or two where you open the case and clean dust buildup inside the chassis using compressed air. However, only attempt this if you’re confident in your ability to safely disassemble and reassemble your desktop.
By following these don’ts, you can minimize the risk of damaging your laptop or desktop during the cleaning process. Remember, a little caution goes a long way in ensuring the longevity and optimal performance of your valuable electronics.
Cleaning Specific Components: A Targeted Approach for a Sparkling Device
Now that you understand the general dos and don’ts of cleaning laptops and desktops, let’s delve into specific components that require focused attention:
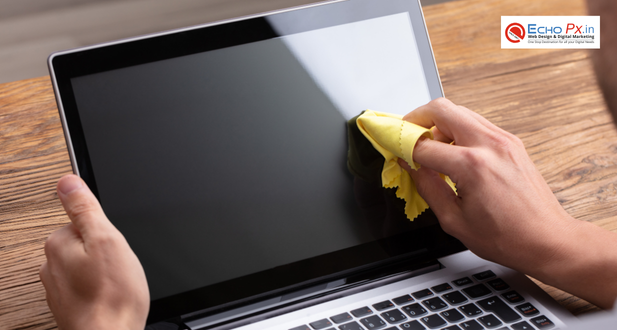
Cleaning the Screen: Tips for Removing Dust and Smudges
- Power Down and Unplug: Always ensure your device is off and unplugged before cleaning the screen.
- Microfiber Magic: Use a dry, lint-free microfiber cloth to gently wipe the screen in straight lines, removing dust and fingerprints.
- Stubborn Smudges: For stubborn smudges, dampen your microfiber cloth slightly with distilled water. Wring it out thoroughly to ensure it’s barely moist, not dripping wet. Wipe the screen gently in straight lines and avoid using circular motions.
- Never Use Harsh Chemicals: Avoid using any cleaning solutions, window cleaners, or disinfecting wipes, as they can damage the anti-glare coating or leave streaks on the screen.
Keyboard Cleaning: Addressing Dirt and Debris Between Keys
- Compressed Air is Your Friend: Use compressed air to gently blow out dust and debris trapped between the keys. Hold the can upright and use short bursts to avoid dislodging any keys.
- Cleaning Slime for Extra Reach (Optional): For a more thorough clean, gently press cleaning slime between the keys. The slime will pick up dust and debris without damaging the keys.
- Cotton Swabs for Tight Spaces: Use cotton swabs dipped in a bit of isopropyl alcohol (70%) to clean around the edges of the keys and other tight spaces. Ensure the cotton swab is barely damp, not dripping wet.
- Never Submerge the Keyboard: Avoid submerging the keyboard in any cleaning solution, even for a quick rinse. This can damage the internal components.
Ventilation and Fan Maintenance for Overheating Prevention
- Compressed Air Power: Use compressed air to gently blow out dust and debris accumulated around vents on the laptop chassis or desktop case. Focus on both air intake and exhaust vents.
- Desktop Internal Cleaning (Optional): For desktops, if comfortable, open the case and clean dust buildup on the fans using compressed air. Caution: Only do this with the power off and unplugged, and avoid spinning the fans manually.
- Elevated Laptop Stands: Consider using a laptop stand to improve airflow circulation underneath your device, especially if you notice overheating issues.
By following these targeted cleaning techniques for specific components, you can ensure a clean and well-maintained laptop or desktop, preventing dust buildup and potential overheating problems.
External Cleaning Techniques: Maintaining a Pristine Exterior
Beyond the screen, keyboard, and vents, here’s how to tackle the external surfaces of your laptop or desktop:
Wiping Down the Exterior Surface with Proper Cleaning Solutions:
- Microfiber Marvels: Use a microfiber cloth slightly dampened with distilled water to wipe down the exterior surfaces of your device (case, palm rest, etc.). Wring out the cloth thoroughly to avoid excessive moisture.
- Non-Abrasive Disinfecting Wipes (Optional): For a more thorough clean, consider using non-abrasive disinfecting wipes specifically designed for electronics. Ensure they are alcohol-free to avoid damaging the finish.
Cleaning Ports and Connectors Safely:
- Compressed Air Reigns Supreme: Use compressed air to gently blow out dust from ports like USB, HDMI, and headphone jacks. Avoid inserting any sharp objects to remove debris.
- Inspecting for Damage: While cleaning ports, take a moment to inspect for any physical damage or bent pins that might require professional attention.
Cleaning Mouse and Touchpad Surfaces:
- Microfiber Magic: For external mouse pads, use a damp microfiber cloth to wipe down the surface.
- Disinfecting Wipes for Touchpads: For built-in laptop touchpads, use a slightly damp microfiber cloth or a disinfectant wipe specifically designed for electronics.
By following these simple external cleaning techniques, you can maintain a clean and professional-looking laptop or desktop, ensuring a pleasant user experience.
Internal Cleaning Considerations: Tread Carefully Inside
For laptops and desktops, internal cleaning can be a more complex task. Here’s what to consider:
Understanding the Risks of Opening the Device:
- Warranty Woes: Opening your device might void the warranty, especially for laptops. Consult your user manual or manufacturer’s website for specific guidelines.
- Component Damage Risk: Disassembling and reassembling electronic components requires technical knowledge. Mishandling delicate parts can lead to permanent damage.
Tips for Cleaning Internal Components without Damaging Them (For the Brave):
- Power Down and Unplug: This is absolutely crucial before attempting any internal cleaning.
- Compressed Air Magic: Use compressed air to gently blow out dust from internal components like fans and heatsinks. Focus on areas with visible dust buildup.
- Consult Online Guides (Optional): If you’re comfortable venturing inside, search for online video tutorials or detailed guides specific to your device model. These can provide valuable step-by-step instructions.
Seeking Professional Assistance for Complex Cleaning Needs:
- When in Doubt, Seek Help: If you’re unsure about your ability to clean the internal components safely, it’s best to seek professional help from a qualified computer repair technician.
- Deep Cleaning Benefits: Professionals have the expertise and tools to perform a comprehensive cleaning, ensuring optimal performance and longevity for your device.
Remember, internal cleaning should only be attempted by those comfortable with the risks and technical aspects involved. For most users, a regular external cleaning routine with compressed air for vents will suffice. When in doubt, prioritize the safety of your device and seek professional assistance.
Regular Maintenance Tips: Keeping Your Device in Top Shape
By incorporating these simple practices into your routine, you can promote long-term device health and minimize the need for deep cleaning:
Establishing a Cleaning Routine for Long-Term Device Health:
- Develop a Habit: Set a regular cleaning schedule, perhaps a weekly wipe down with a microfiber cloth for external surfaces and a monthly blast of compressed air for vents.
- Seasonal Deep Cleaning: Consider a more thorough cleaning with isopropyl alcohol (if needed) every few months, especially during seasons with higher dust or pollen levels.
Using Protective Covers and Screen Protectors:
- Case for Defense: Using a laptop case can protect your device from scratches, dings, and dust accumulation.
- Screen Shield: A screen protector adds an extra layer of defense against scratches, fingerprints, and smudges.
Proper Storage and Handling Practices to Minimize Dust Accumulation:
- Dust-Free Zone: When not in use, store your laptop or desktop in a clean, dust-free environment.
- Keyboard Cover (Optional): Using a keyboard cover can help prevent dust and debris from falling between the keys.
- Mind Your Food and Drinks: Avoid eating or drinking near your device to minimize the risk of spills.
By following these regular maintenance tips, you can keep your laptop or desktop clean, functional, and looking its best for years to come.
Troubleshooting Common Issues: Beyond Cleaning
While cleaning can address many issues, some problems require further troubleshooting:
- Sticky Keys and Unresponsive Touchpads: Compressed air or cleaning under the keys might help. For persistent issues, professional cleaning or replacement might be necessary.
- Overheating and Fan Noise: Clean vents with compressed air. Ensure proper airflow by using a laptop stand. If issues persist, consult a technician for potential hardware problems.
- Liquid Spills and Water Damage: Immediately power down, unplug, and remove the battery (laptops). Do not turn it back on. Seek professional help to assess the damage and prevent further issues.
Conclusion: Maintaining Optimal Performance with Proper Cleaning Practices
By following the cleaning techniques and maintenance tips outlined in this guide, you can ensure your laptop or desktop remains in top shape for years to come. Regular cleaning not only keeps your device looking sharp but also prevents dust buildup that can lead to overheating, sluggish performance, and even hardware damage.
Remember, a proactive approach is key. Developing a cleaning routine with regular external wipes and periodic blasts of compressed air can significantly reduce the need for deep cleaning or professional intervention.
Investing in protective accessories like a laptop case and screen protector provides an additional layer of defense against scratches, spills, and dust.
For most users, a basic understanding of proper cleaning techniques, coupled with a commitment to regular maintenance, is sufficient to keep their laptops and desktops functioning optimally. However, if you encounter any complex cleaning needs or persistent issues beyond cleaning’s scope, don’t hesitate to seek professional assistance from a qualified technician.
By prioritizing proper cleaning practices and preventative measures, you can ensure your valuable electronic companion performs flawlessly and delivers a smooth user experience for years to come.
Do power off the device and disconnect it from the power source before cleaning.
Do clean the keyboard and screen regularly to prevent dust buildup.
Don’t spray cleaning solutions directly onto the device; instead, apply them to the cloth first.
Don’t apply excessive pressure when cleaning delicate components like the screen or keyboard.